
Make the most of your YubiKey: 2FA, PIV and PGP!
As someone who sometimes accidentally deals with computer science-y stuff you probably already own a YubiKey . In this blog post I want to show you how you can make the most use of it: Starting with 2FA and making excessive use of the PGP functionality.
Feedback wanted!
I’m always glad about feedback. If you spot an error in this post, let me know and I’ll fix it.What’s a YubiKey?
2-factor authentication/ multi factor authentication
When talking about online authentication most services use a username/ password combination. For example to log into GMail you use your mail example[at]gmail.com and the associated password password12345 to prove to Google that you are, in fact, the owner of the account. Generally speaking, to authenticate (to prove that you are who you claim you are) there are three possible factors 1 :
- You know something (a password),
- You have something (a keycard),
- You are something (biometrics).
In recent years, most online accounts have offered 2-factor authentication. Here, you not only need one, but two factors to gain access to the account. There are a variety of 2nd factors, but here are some common ones you might have come across:
- Mobile App that generates a code (Steam Mobile Guard, Microsoft Authenticator, Google Authenticator, Authy),
- Verification code sent to you via SMS,
- Verification code sent to you via Mail,
- Phone Call Verification.
All of the above show that you have something (access to the phone). YubiKeys work in exactly the same way: They are USB devices that implement some standards 2 so you can use them as a second factor.
Where can I use YubiKey 2FA?
A non-exhaustive list of companies that allow YubiKey 2FA: Microsoft, GitHub, Google, Twitter, BitWarden, eBay, Cloudflare, AWS, Keeper, GitLab, Coinbase and many more.
PIV smart card
YubiKeys also provide smart card functionality (Personal Identity Verification, PIV) specified in NIST SP 800-73 . This means they can save key pairs (certificates 3 ) in predefined slots :
- Slot 9a: PIV Authentication: This certificate is used to authenticate the card and its holder. It may be used for things like system logins.
- Slot 9c: Digital Signature: This certificate is used to sign things like documents, files and executables.
- Slot 9d: Key Management: This certificate is used to encrypt and decrypt files and mails.
- Slot 9e: Card Authentication: This certificate is used for things like PIV enabled door locks.
I left out some of the other slots, you can look them up here .
To summarize: A YubiKey is a hardware device that provides smart card functionality. This means that it can save X.509 certificates in the slots outlined above.
PGP smart card
YubiKeys can also serve as a OpenPGP smart card. This means they implement ISO/IEC 7816-4 and -8 (I’m not that smart, this is shamelessly copied from Wikipedia ). Like PIV smart cards it allows for storage of key material (private/ public key pairs) on the device and perform operations on the device without the key ever leaving the device.
You can save a key for authentication, one for signing and one for encryption on your device.
PGP is important because you can combine it with git to sign your commits. This can be really neat: Suppose you have your blog auto build and deploy using GitHub Actions whenever a new commit is made. You could required signed commits so if a bad actor is able to commit something to your repo it at least isn’t immediately deployed.
You can also use gpg-agent, a ssh-agent implementation to save your SSH keys to the YubiKey.
Getting started
Now let’s actually start using the YubiKey. For this blog post we’re using Windows. I also try to use as much GUIs as possible. I might do follow-ups for WSL, Linux and Android.

Enable 2FA in all of your online accounts
I assume you already use some sort of Authenticator App for most of your online accounts. You can now look at this list and figure out which companies allow YubiKeys. Follow the instructions to add the device to each of these accounts. I’ll wait here.
Setting up the GPG smart card functionality
You can ride the high of having YubiKey 2FA for a while but then you’ll be wanting more. Way more. So you remember: That weird guy on the interwebs was talking about GPG smart cards. Obviously, you want that, nay, you need that. So here’s how.
For the sake of brevity, I’ll gloss over some parts of this guide. Here’s an excellent guide that is going to help you a lot. It is mainly written for Linux/ BSD though so your mileage may vary.
Preparing your environment
You might want to take this seriously for once
In the next few steps you’re creating something that might as well be a password. If somebody gets ahold of your private keys they can impersonate you. Thus it is recommended to have a separate device (laptop) with no networking, secure hardware and firmware (i.e. Coreboot and Intel ME removed), ideally running a live linux image that you verified is genuine.
The box above is really good advice, so naturally I’m going to ignore it.
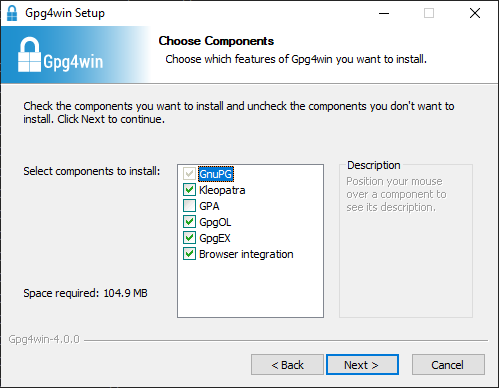
We need GnuPG ( Gpg4Win ) installed so download it, verify its checksum and install it. Select all checkboxes except GPA when prompted:
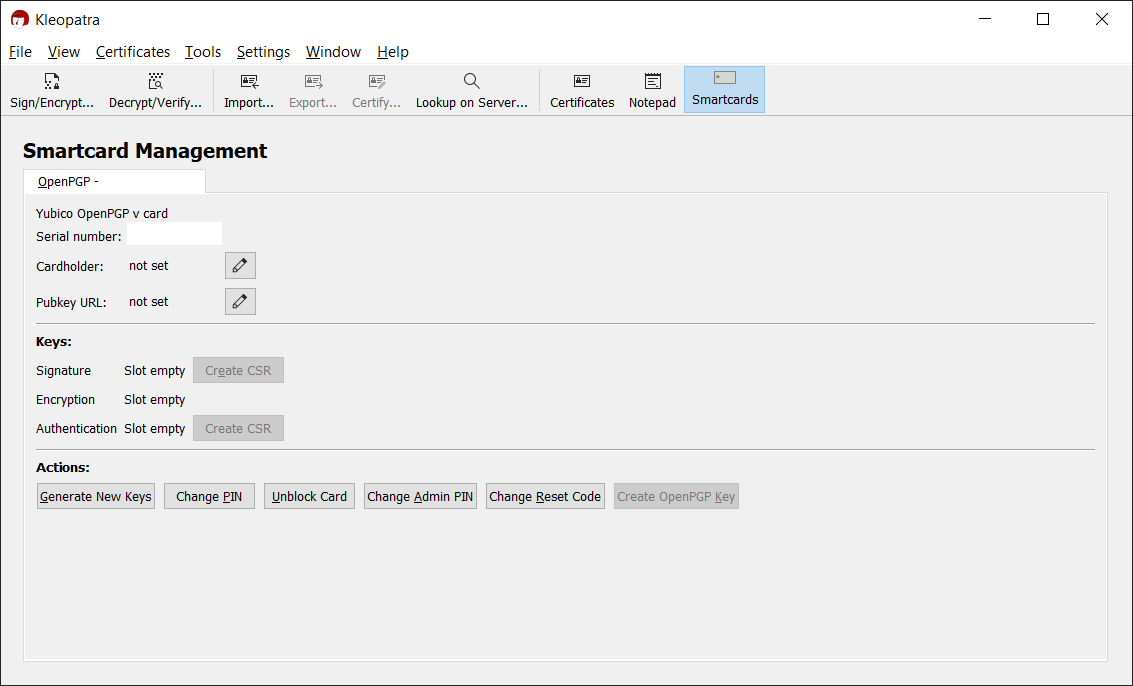
Now you can open Kleopatra, Gpg4Win’s key management tool. There, click on the smart card tab. If the YubiKey has never been used this should look like this:

Setting the card PINs
Now, you need to set two PINs: the admin PIN that is used for administrative actions. The default is 12345678. The other PIN is the user PIN, that is used
to unblock the card. The default user PIN is 123456. To do this first click on the “Change Admin PIN” button and follow the wizard, then do the same for
“Change PIN”.
You can now optionally use the edit button to set your name as the cardholder.
Generating the keys
Here’s now the moment we’ve been waiting for: Click the “Generate New Keys”, enter your name and mail address and chose a key length of 2048 bits (i.e. RSA 2048) 4 .
In the process you will be prompted to enter both your admin PIN and your user PIN. Be extremely careful when to enter which. Once the operation is finished you’re going
to be asked to specify a passphrase to export the key as backup. Chose a long and secure passphrase. You’re hopefully never going to need it. Copy the GPG key on a
USB flash drive, write down the passphrase (if you’re not using a password manager) and lock both of them in a safe 5 .
Using the GPG smart card
Now that we’ve generated the keys we can start using them. In this guide we’re going to have four use cases: Firstly, E-Mail signing and encryption. Secondly, Git commit signing. Thirdly, SSH logins.
Signing and encrypting E-mails
For their mails on desktop most people use three “clients”: Microsoft Outlook, Mozilla Thunderbird or a web client offered by their provider.
We should also distinguish between signing and encrypting mails. An electronic signature can be thought of as kind of a checksum. It means that the one who owns the key — and nobody else! — has authored the mail/ text/ executable and that the object hasn’t been changed. For the nerds: Signing provides integrity and authenticity guarantees. For mails signing works by sending the signature with the mail. Clients who understand GPG will check the signature, clients who don’t will simply ignore it. That’s why I recommend to only sign by default since most people don’t have PGP key pairs (be the change you want to see in this world!).
Encryption, on the other hand only has confidentiality and integrity: The text is changed such that it can only be decrypted by means of your private key. This means it can’t have been changed (otherwise the decryption wouldn’t work) and nobody but you and the sender can read it. It doesn’t guarantee that the sender is the one who they claim to be. Thus, it makes sense to both encrypt and sign your mails.
Outlook
Outlook more or less works out-of-the-box with the GpgOL outlook extension bundled with Gpg4Win.
Thunderbird
Thunderbird supports GPG natively, but doesn’t support smart cards natively, yet. It is possible to get Thunderbird to use GnuPG instead, then it should “just work”. If there’s a need I might update this part later, let me know!
Mailvelope
Mailvelope is an extension for most major browsers (Firefox, Chrome, Edge) to enable PGP in the web clients of many E-Mail providers such as GMail, GMX, Web.de or Mailbox.org. It needs to be set-up to talk to GnuPG. Personally, I didn’t get signing e-mails to work in GMail. I know that it works well for some people, though.
Signing Git commits
You can use your smart card to sign git commits. Here’s the relevant documentation . For that you first need to query for your key id, then set the signing key ID and the gpg program in the git settings:
$ gpg --list-keys
< Censored path >
------------------------------------------------
pub   rsa2048 2021-05-30 [SC]
      < $KEYID >
uid           <User ID>
uid           <User ID>
sub   rsa2048 2021-05-30 [A]
sub   rsa2048 2021-05-30 [E]
$ git config --global user.signingkey <YOUR $KEYID HERE>
# Point git to your GnuPG installation:
$ git config --global gpg.program "C:\Program Files (x86)\GnuPG\bin\gpg.exe"
$ git tag -s # Sign a tag
$ # WRONG: git tag -a
$ git commit -S # Sign a commit
Add your public key to the relevant platforms, so you get that nice checkmark (e.g. GitHub ).
SSH logins
Mind the OS!
This section is for Microsoft Windows. I am going to publish a version of this article for Linux, but most of this guid is probably not relevant for you.
Create a file %APPDATA%/gnupg/gpg-agent.conf:
enable-ssh-support
enable-putty-support
Create a file %APPDATA%/gnupg/gpg.conf:
use-agentFinally, create a file %APPDATA%/gnupg/sshcontrol:
Note on the line break
This file needs to have Unix line breaks (LF), not CRLF. It also needs to have exactly one at the end.
<Your Key ID here, the one you gave git>
Disable the ssh-agent Windows Service (e.g. by opening Task Manager, going to the “Services” tab and right-clicking on it). You can then restart the GPG agent
running
$ gpg-connect-agent killagent /bye
OK closing connection
$ gpg-connect-agent /bye
gpg-connect-agent: no running gpg-agent - starting 'C:\\Program Files (x86)\\GnuPG\\bin\\gpg-agent.exe'
gpg-connect-agent: waiting for the agent to come up ... (5s)
gpg-connect-agent: connection to the agent established
At this point the key should show up in your favorite SSH client:


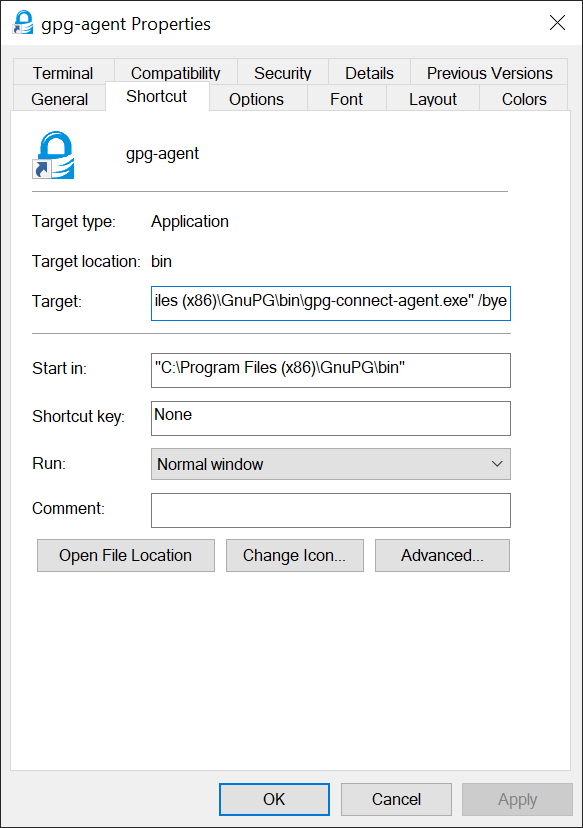
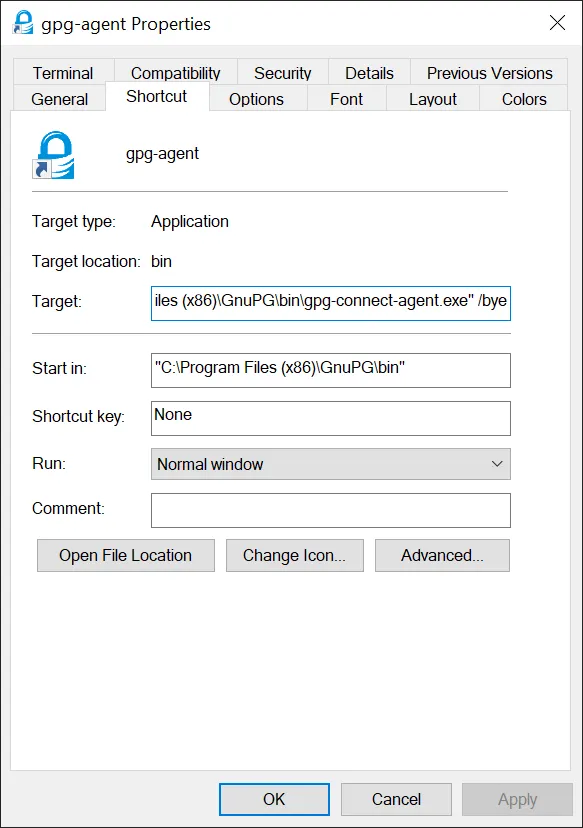
To autostart the agent you can create a shortcut in %APPDATA%\Microsoft\Windows\Start Menu\Programs\Startup to the target
"C:\Program Files (x86)\GnuPG\bin\gpg-connect-agent.exe" /bye:
One thing that doesn’t work yet is to use the official OpenSSH binaries that are bundled with windows (a sentence many wouldn’t have expected to read only a
few years ago). To do this we need to bridge gpg-agent and ssh. We can do this using benpye/wsl-ssh-pageant .
This tool is able to expose the sockets and pipes these tools expect 6 . Download wsl-ssh-pageant-amd64-gui.exe. Put it somewhere on your hard drive (I just used
C:\tools\wsl-ssh-pageant, but it really doesn’t matter). Create a new shortcut in your autostart folder (%APPDATA%\Microsoft\Windows\Start Menu\Programs\Startup)
and set its target to
C:\tools\wsl-ssh-pageant\wsl-ssh-pageant-amd64-gui.exe
  --wsl C:\tools\wsl-ssh-pageant\ssh-agent.sock #< The socket we can use inside WSL
  --winssh ssh-pageant #< The pipe OpenSSH will use to authenticate
  --systray #< Minimize to systray
Double-click on the shortcut to run it. You should see the program appear in your systray after a few seconds.
You can check if it worked in PowerShell:
PS C:\> $Env:SSH_AUTH_SOCK = "\\.\pipe\ssh-pageant"
PS C:\> ssh-add -L
ssh-rsa <Key> cardno:<Card ID>
To use it in WSL add the export SSH_AUTH_SOCK=/mnt/c/tools/wsl-ssh-pageant/ssh-agent.sock to your ~/.bashrc (if you use zsh or fish you know
what to do). This works for WSL 1, WSL 2 has known issues with this approach. There are
workarounds by they seem a bit unstable. Keep an eye on this issue , this might be the fix.
You can now import the public portion of your GPG keys to the remote servers.
Final remarks
So this is a really basic guide on how to do cool stuff with your YubiKey. At some point in the future I’m going to show you how to set up Windows Hello to work with the YubiKey. I didn’t touch at all on Linux or Android, which might warrant their own blog posts.
Finally, now you’re pretty secure, but there’s still some stuff you can do. Rotate your keys every few years and keep up with the recommended key lengths. Exchange your public key with others, upload it to key servers. Sign the keys of your friends to build a web of trust. Think about disaster recovery (e.g. the break glass scenario I hinted at earlier).
You could also try to account for more advanced use cases like ssh-agent forwarding or gpg-agent forwarding. I might cover them in future blog posts
but for now I want to link this fantastic guide which covers a lot more than this simple post did.
Footnotes
-
https://www.pearsonitcertification.com/articles/article.aspx?p=1718488 ↩
-
To be precise: WebAuthn , or Universal Second Factor (U2F) . ↩
-
Technically, certificates and private/public key pairs are something different, but for now, let’s just pretend they were exactly the same thing. ↩
-
According to Yubico , you can use 4096 if you generate the keys outside of the key and copy it to the key. The German BSI recommends a key length of >= 2000 bits until the end of 2023, after that a key length of >= 3000 bits. In my opinion: It’s probably fine, but if you are able to, chose the maximum possible. ↩
-
Use this key (file) when you lose your physical key. You can revoke your keys on key servers for instance. ↩
-
I’m not particularly happy having a 3rd party tool doing this and I will update the article as soon as there’s a better way. ↩