
How to write a game engine from scratch
Game Engine Series · by Frederic Schönberger
Series overview
- How to write a game engine from scratch — You are here.
- A Basic Logger — We build a logging infrastructure with Boost.Log that we can use to look into what our engine is doing.
- Rendering Overview — Here, we discuss rendering, define high-level and low-level rendering and sketch what we're about to build.
- First steps with Vulkan — In this part of the series we create the Rendering Subsystem and initialize a Vulkan Instance.
- Vulkan Validation Layers — In this article we’re going to enable validation layers for our Vulkan renderer. They allow us to catch commong mistakes and errors in Vulkan code.
In this article series we’re going to write a small game engine for a voxel minecraft-esque game. We’re going to use Vulkan, Khronos’s successor to the cross-platform OpenGL APIs. These articles are meant to primarily target Microsoft Windows, I will point out platform-specific code, so that people on Linux should be able to follow along as well.
Help wanted!
A game engine is a complex piece of code and I’m not an expert in all areas. I will try my best to give you accurate information and to link to more resources such that if you’re interested you can always check out more.
If I got something wrong or you want to contribute, please hit me up on twitter (@current_thread) . I would be interested in having someone who’s experienced with DirectX 12 help me out, but any help is more than welcome.
What we’re building
In this series, we’re going to build a small 3d engine. It should be render-backend agnostic (that means it should - in theory - support different graphics APIs). The game engine needs to be heavily multithreaded. We’re going to use C++20 with modules 1 . In the future, we might venture into VR and ray tracing, but I don’t want to make any promises.
Project set-up
First, let’s look at the project structure and then drill into the details: Our project is going to have two projects, Engine and Game. The first
project is a dynamic library that is consumed by the second project. The second project is our executable.
We’re going to develop our game engine with Visual Studio . In my opinion, Visual Studio is the best IDE for C++ development. You can also have a look at Resharper C++ , which elevates VS to a new level. Furthermore, you should check out if you can get access to GitHub Copilot , because its completions make you type even less.
Obligatory Microsoft Employee Disclaimer
Here is the obligatory disclaimer that I’m – at the time of writing – employed by Microsoft. I’m writing this blog post in my free time and it really is my opinion that Visual Studio is the best (C++) IDE.
We’re going to rely on many external libraries (e.g., boost ). Dependency management in C++ is hell, so we’re going to use the Visual Studio integrated package manager vcpkg .
But you're not using ${user.favoriteTool}!
I understand that some of these choices are highly opinionated. They are merely suggestions how you could set up your dev environment. You could also use CMake with your distro’s package manager.Folder structure
Here’s my proposed folder structure. It’s based on the folder structure in Game Coding Complete 4th Edition by McShaffry et. al. 2
.
├── assets/
├── bin/
│   ├── Game_Debug/
│   └── Game_Release/
├── doc/
└── src/
    ├── Engine/
    │   └── Engine.vcxproject
    ├── Game/
    │   └── Game.vcxproject
    ├── .clang-format
    ├── Voxels.sln
└── vcpkg.jsonassetscontains all of our game’s assets.bincontains the game’s executables.doccontains the generated documentation (if we set up something like Doxygen in the future).srccontains all source files.- Each project gets its own subfolder with the project file in it.
- We can also find the
vcpkgmanifest here. - Lastly, we can use
clang-formatso we have a proper coding style 3 .
Creating the Visual Studio Solution
Now, we’re going to actually create the Visual Studio Solution. Open up Visual Studio and create a new DLL:

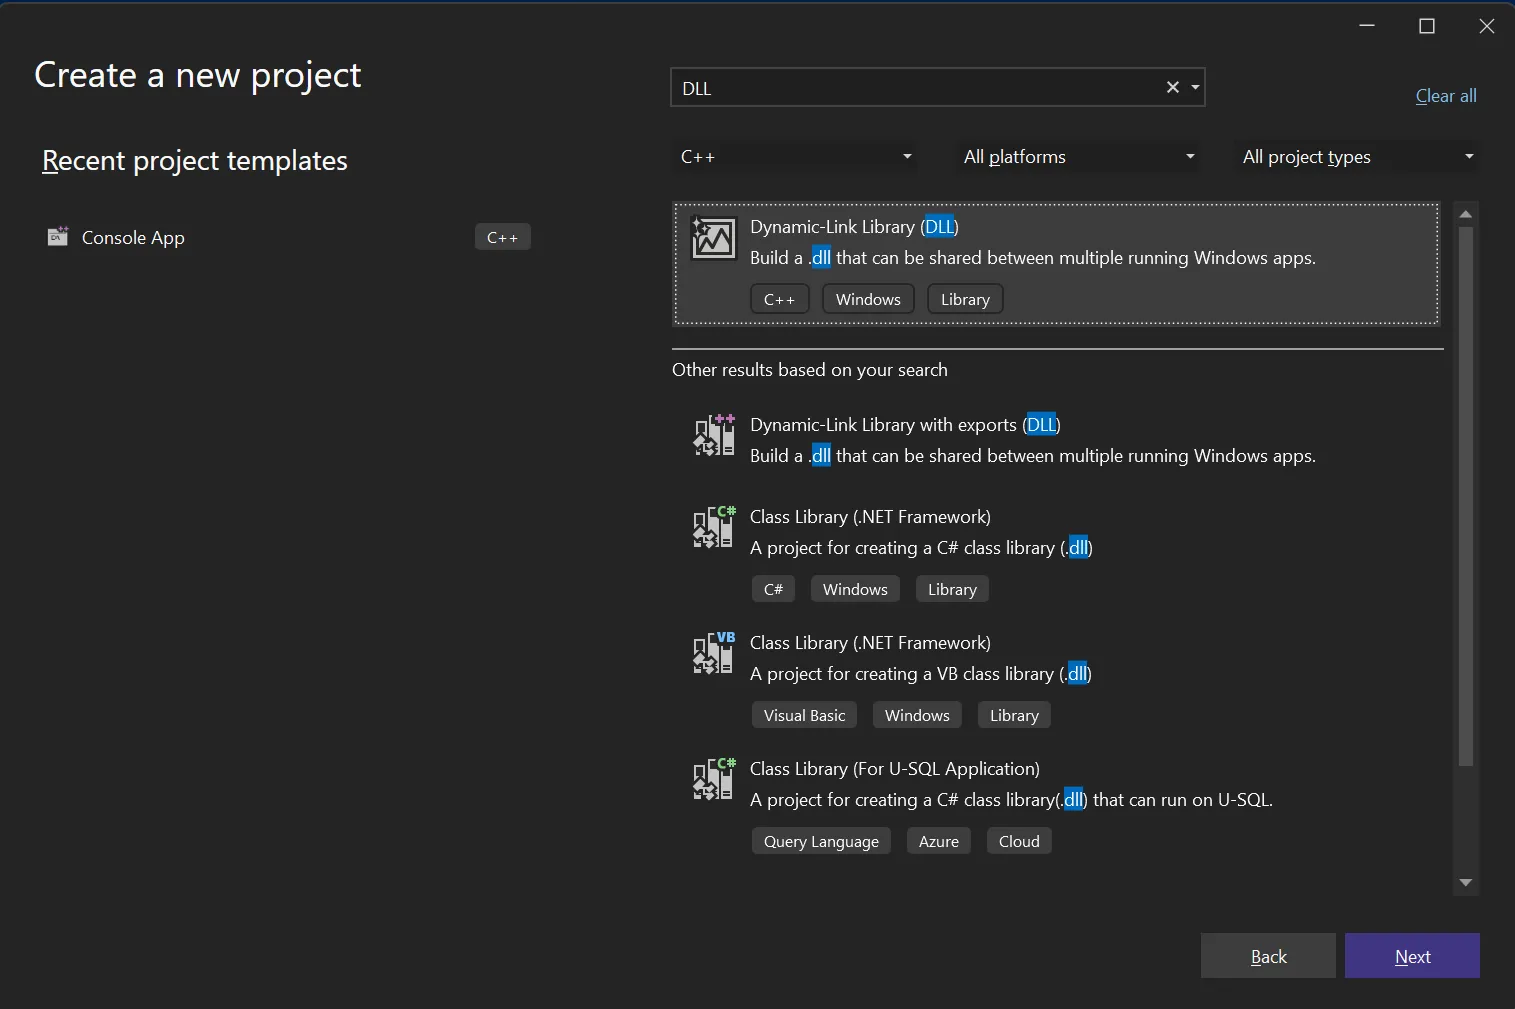
In the following wizard chose an appropriate path for your solution file. Remember that we’re going to put it in the src/ folder. 4
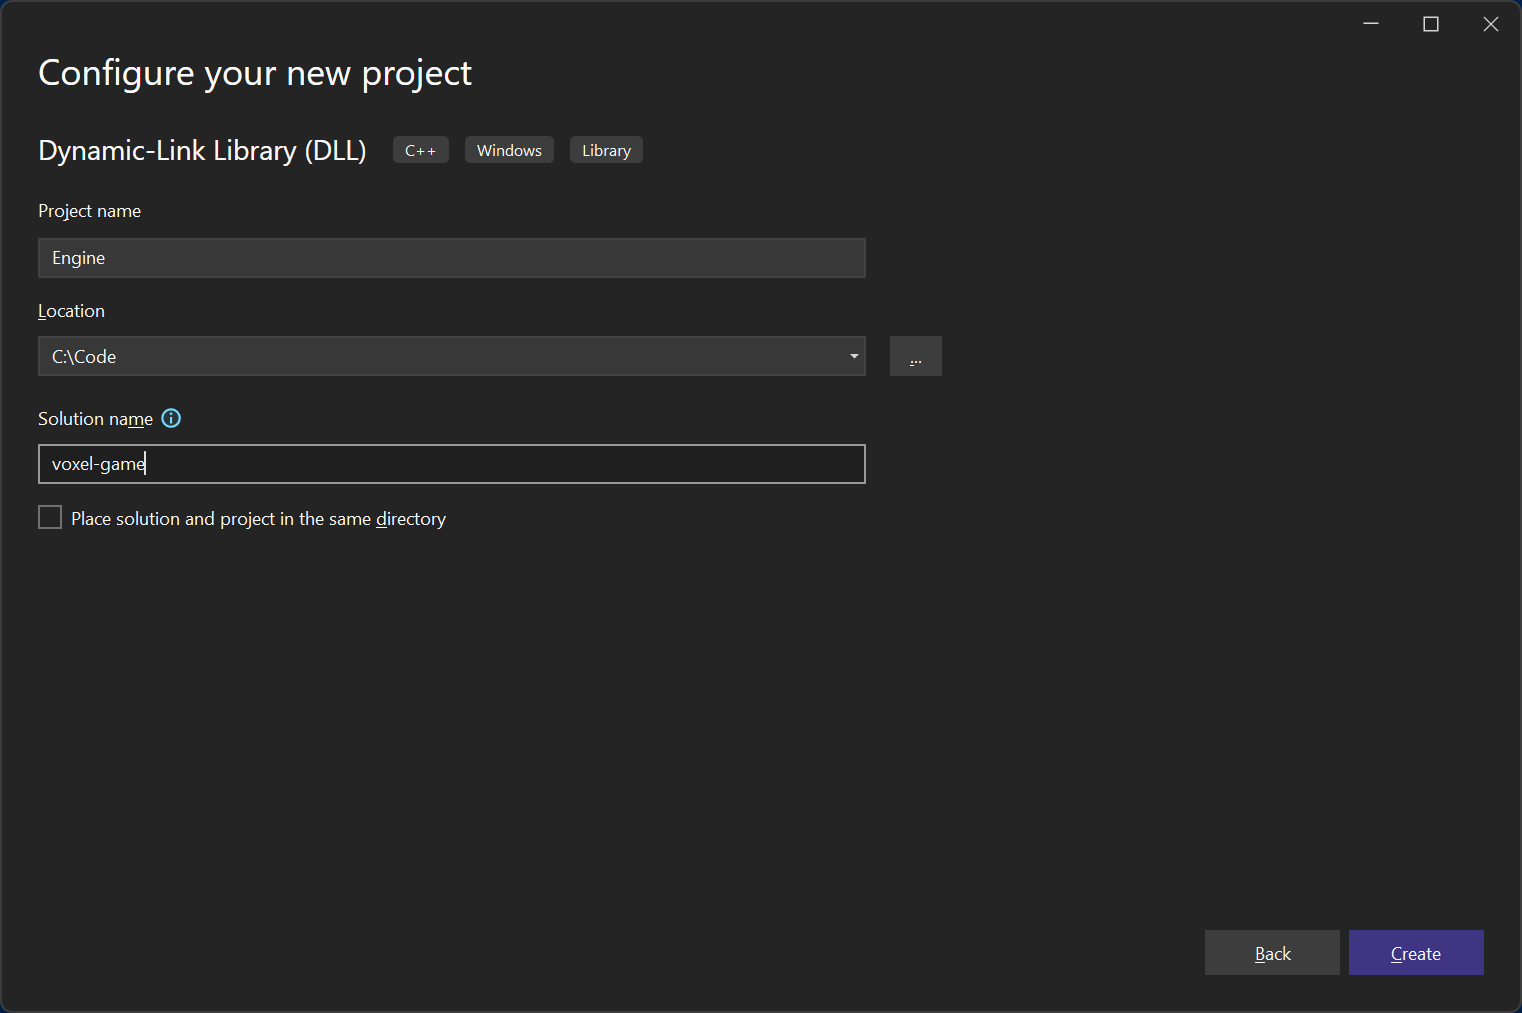
Gotcha!
You must be careful to follow our folder scheme here. You probably want to quit out of Visual Studio, and cut-and-paste the *.sln files to the
src/ folder.
Next, we’re going to adjust some settings. Right-click on your Engine project and select “Properties”. On the top-right click “Configuration
Manager”. For “Active Solution Platform” select “<Edit…>” and delete x86. In the year 2023 we’re really not gonna support 32 bit architectures anymore.
Back in the properties window, choose “All Configurations” in the top-left combox-box and change the following values (again, this assumes your
solution is in src/):
- General:
-
Output Directory:
$(SolutionDir)..\bin\Game_$(Configuration)\This causes the DLL to build to
/bin/Game_{Debug, Release}and be automatically found by our game executable. -
Intermediate Directory:
$(SolutionDir)..\tmp\$(ProjectName)_$(Configuration)\This causes all temporary files of the DLL to land in
/tmp/Engine_{Debug, Release}. -
C++ Language Standard: Preview - Features from the Leates C++ Working Draft (/std:c++latest)
We’re going to use C++20 features and – rarely – C++23 features. Thus it is necessary to allow for all the features the compiler currently supports.
-
- vcpkg:
-
Use Vcpkg Manifest: Yes
Manifests are a way to specify the project dependencies. Instead of installing the globally, we’re going to manage them on a per-solution basis.
-
- VC++ Directories:
-
All Modules are Public: Yes
We’re going to use C++ modules in our DLL. To be able to use them in our Game executable, we have to export them. This setting will make sure they are found by the executable.
-
- Precompiled Headers:
-
Precompiled Header: Not using Precompiled Headers
We’re not going to use precompiled headers because we’re going to use C++20 modules.
-
Delete all files from the engine project and create a new file called prologue.hpp. This file will contain all macros that are vitally important for
our entire project. Right now, all we’re interested in is to be able to export and import stuff from our library, so we’re going to create a macro for
that:
// prologue.hpp
#pragma once

#ifdef _WINDLL
    //! \brief If the library is being compiled as a DLL, this macro is defined and
    //! can be used to export symbols.
#   define ENGINE_API __declspec(dllexport)
#else
    //! \brief If the library is included, this macros is included and used to import
    //! symbols.
#   define ENGINE_API __declspec(dllimport)
#endif
Platform-specific code
If you want these examples to work on Linux, __declspec is not going to work. In this case, you want __attribute__((visibility("default"))) and
extend the macros above to check for Windows (e.g. with #ifdef _WIN32). Here’s a StackOverflow answer that
gives an example.
For now, we just want to have our library do something. So we’re creating a new file engine.ixx. You can do this by right-clicking on the project,
then selecting “Add -> Module”. It looks like this:
// engine.ixx
module;

#include "prologue.hpp"

#include <iostream>

export module engine;

export namespace engine {
    ENGINE_API void say_hello() {
        std::cout << "Hello, World!\n";
    }
}
Avoiding "fatal error C1001: An internal error has occurred in the compiler"
C++20’s modules are kind of new and both compiler support and IntelliSense support is sometimes really janky. You might run into stupid compiler
errors like the infamous C1001. One thing that (in January 2023) seems to provoke this error is mixing #include and import with STL headers. Thus,
as a rule of thumb, in all of the code snippets we’re going to include STL headers in the global module fragment and not import them.
Next, create a new Console Application. Then, right click on your new Game project and set it as startup project. Next, click on the “References”
node in the Solution Explorer, “Add Reference” and add a reference to the engine project. Now, you need to apply the same settings from above to this
project as well.
These are the additional settings that should be changed:
- Debugging:
-
Working Directory:
$(SolutionDir)..\Sets the working directory to the root folder of our project.
-
Finally, change the main.cpp to use our DLL:
import engine;

int main()
{
	engine::say_hello();
	return 0;
}
When you build and run the project you should see “Hello, World!” printed in the console.
C++ modules in 3 minutes or less
The above code looks probably a bit unfamiliar to people who haven’t kept up with the newest language developments. Essentially, modules are a replacement for the traditional header/ source file pair. They have many nice properties such as reduced compile times, no transitive-by-default imports and selective exports. Read this excellent blogpost to get into the nitty gritty, here’s a very rudimentary crash course.
A module is defined in a module interface unit. In Visual Studio they have the ending *.ixx by default, but they can be regular *.cpp files as
well. They look like this:
module; // Optional, "Global module fragment"

#include <unordered_map>

export module my_module;

import <vector>;
import other_module;
export import yet_another_module;

void do_bar() {

}

export template<typename T>
void do_foo(T) {
    do_bar();
}
Modules can start with a “global module fragment” module;. In it, we can include all files whose behavior depends on preprocessor state. In other
words: If your header file changes depending on if certain #defines are present, they should probably go there. Note that no other code may go in
the global module fragment.
We start our module with export module <module name>;. Now, we can import other modules. Under certain circumstances we can even import header
files like <vector>. We can re-export imports (with export import) which makes them available to client code.
Similarly, we can export things from our module: Typically, we can export classes, structs, type aliases, templates, functions and variables 5 .
Everything that is not exported from a module stays internal to it. This means, that clients of my_module are going to see do_foo but not
do_bar. Preprocessor macros will never be exported from modules (that’s why prologue.hpp is a header and not a module).
Any code can consume modules by means of the import statement. In particular, in our game code main.cpp is not a module, but imports our engine’s
module!
Note that this only scratches the surface and that you should really read this excellent blogpost .
This wraps the first part of our series, next time, we’re going to build a logging infrastructure.
Footnotes
-
I have had to suffer and so will you. ↩
-
A quick note on Game Coding Complete: I feel this book is a nice read for beginners. It touches on a lot of subjects and gives you the words to google for better solutions. In no way however should you treat the author’s words as the “one, true way to do things”. Take it as a starting point and learn to do it better. ↩
-
This blog uses
BasedOnStyle: WebKit

ColumnLimit: 160

IncludeCategories:
- Regex: '^"(\.\.\/)*prologue.hpp"$' # Prologue comes first in headers
  Priority: -2
# Now we have the file's main header
- Regex: '^(<|"(gtest|gmock)/)' # GTest/ GMock headers should come next
  Priority: 1
- Regex: '^<[[:alnum:]]+>$' # Now, we do STL headers
  Priority: 2
- Regex: '^<.*>$' # Now, we do all external headers
  Priority: 3
- Regex: '^.*$' # And finally, all other headers
  Priority: 4
but it’s really a matter of taste. ↩
-
You can also put it in the root folder. The nice thing about this approach is that you see the
assets/in VS’s folder view. Again, this is a matter of taste. ↩ -
One needs to be careful with
staticin this context, but let’s not discuss this right now. ↩